Lightbits is installed through Ansible and you must configure the example Ansible configuration files based on the environment. This article details how to configure those files for Azure.
Getting Started
First, ensure that you have followed the steps to Downloading And Preparing the Ansible Environment and are using the same versioning and Lightbits repository key.
You can then SSH into your Ansible installer VM using a method described in the SSH Into An Azure VM article.
To complete this section, you will need the private IP addresses of all Lightbits target VMs that were deployed in the Deploying Lightbits Targets step.
Get Lightbits Target VM IP Addresses
- To get the private IP addresses of the Lightbits target VMs, navigate to the Virtual Machines blade in the Azure portal.
- Find the Lightbits target VM and click on the name.

- Inside the VM Overview section under Properties, the Private IP address is shown in the Networking section.
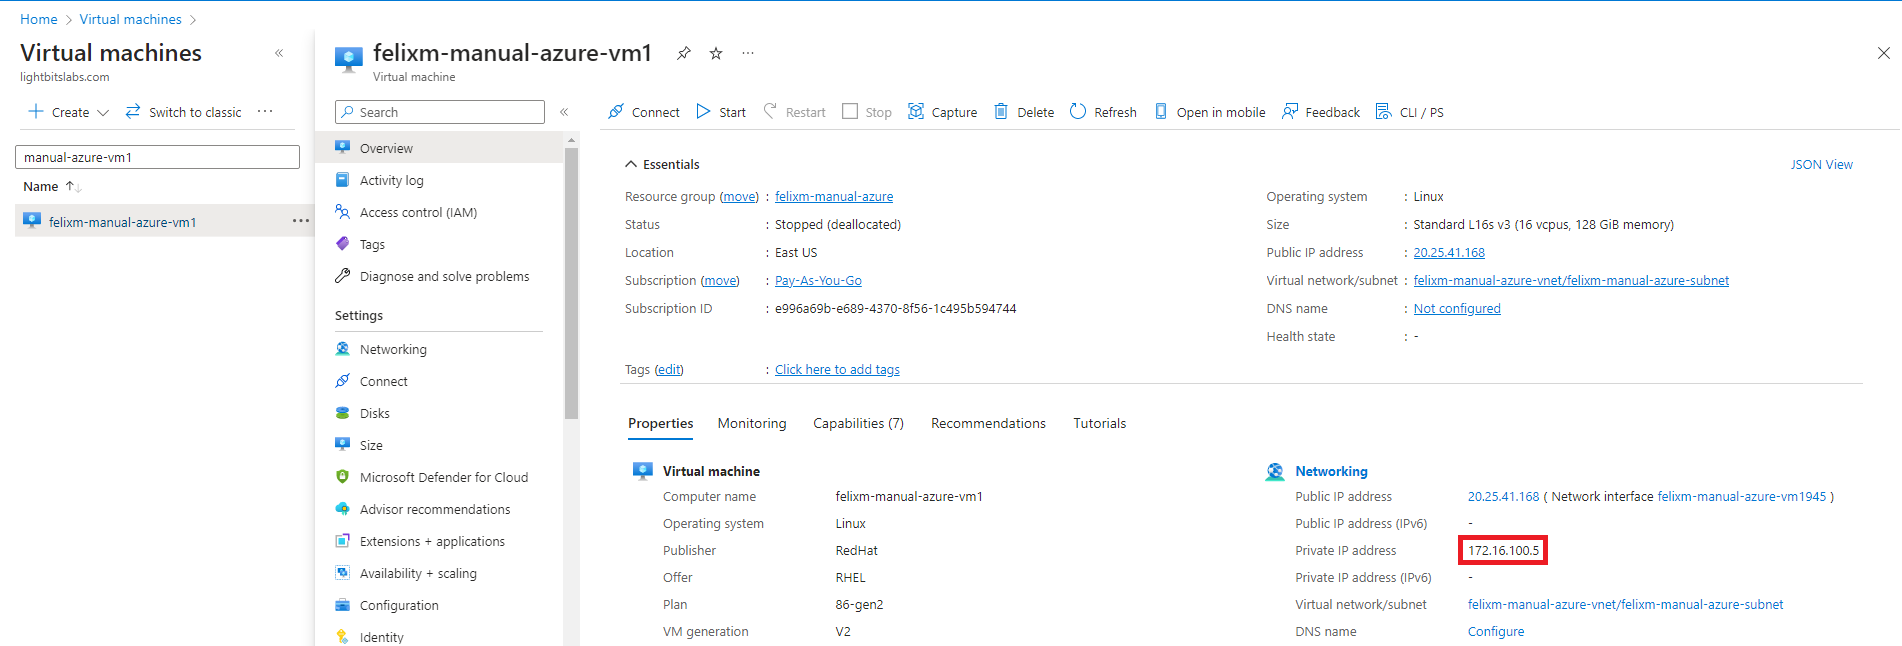
- Copy the IP addresses for all Lightbits storage VMs and keep them safe for use in the following sections.
Configuring the Hosts File
The Hosts file contains information about the Lightbits target storage nodes, so that Ansible can configure them prior to creating a cluster.
- Open the Hosts file.
xxxxxxxxxxvi ~/lb_install/ansible/inventories/cluster_example/hosts- Inside the text editor, change the content to reflect one of the examples below. The choice will depend on if you are using an SSH key or username/password.
If you are using more than the minimum of three servers, add another line for each server. Remember to add the server name(s) to the duros_nodes and etcd sections.
Hosts File Example Using an SSH Key
- Edit the following variables:
$VM_IP{i}$KEYNAME$VM_USERNAME$LIGHTBITS_REPO_TOKEN$DOCKER_REPOSITORY_USERNAME
server00 ansible_host=$VM_IP0 ansible_connection=ssh ansible_ssh_private_key_file=/lb_install/keys/$KEYNAME ansible_ssh_user=$VM_USERNAME ansible_become_user=rootserver01 ansible_host=$VM_IP1 ansible_connection=ssh ansible_ssh_private_key_file=/lb_install/keys/$KEYNAME ansible_ssh_user=$VM_USERNAME ansible_become_user=rootserver02 ansible_host=$VM_IP2 ansible_connection=ssh ansible_ssh_private_key_file=/lb_install/keys/$KEYNAME ansible_ssh_user=$VM_USERNAME ansible_become_user=root [duros_nodes]server00server01server02 [duros_nodes:vars]local_repo_base_url=https://dl.lightbitslabs.com/$LIGHTBITS_REPO_TOKEN/$DOCKER_REPOSITORY_USERNAME/rpm/el/8/$basearchauto_reboot=falsecluster_identifier=ae7bdeef-897e-4c5b-abef-20234abf21bf [etcd]server00server01server02 [initiators]- Save and exit the file.
Hosts File Example Using a Username And Password
- Edit the following variables:
$VM_IP{i}$VM_USERNAME$VM_PASSWORD$LIGHTBITS_REPO_TOKEN$DOCKER_REPOSITORY_USERNAME
server00 ansible_host=$VM_IP0 ansible_connection=ssh ansible_ssh_user=$VM_USERNAME ansible_ssh_pass=$VM_PASSWORD ansible_become_user=root ansible_become_pass=$VM_PASSWORDserver01 ansible_host=$VM_IP1 ansible_connection=ssh ansible_ssh_user=$VM_USERNAME ansible_ssh_pass=$VM_PASSWORD ansible_become_user=root ansible_become_pass=$VM_PASSWORDserver02 ansible_host=$VM_IP2 ansible_connection=ssh ansible_ssh_user=$VM_USERNAME ansible_ssh_pass=$VM_PASSWORD ansible_become_user=root ansible_become_pass=$VM_PASSWORD [duros_nodes]server00server01server02 [duros_nodes:vars]local_repo_base_url=https://dl.lightbitslabs.com/$LIGHTBITS_REPO_TOKEN/$DOCKER_REPOSITORY_USERNAME/rpm/el/8/$basearchauto_reboot=falsecluster_identifier=ae7bdeef-897e-4c5b-abef-20234abf21bf [etcd]server00server01server02 [initiators]- Save and exit the file.
Configuring the Server Configuration Files
Each VM used in the Lightbits cluster must have a configuration YAML file located in the ~/lb_install/ansible/inventories/cluster_example/host_vars/ directory. The name of the file must match the name given to the node in the ~/lb_install/ansible/inventories/cluster_example/hosts file. For example: server00.yml, server01.yml, server02.yml. This will be referenced as $SERVERNAME.
The configuration file for each server includes a section for initialDeviceCount and maxDeviceCount. In the cloud, these are the same and are determined by the VM size that was selected. For the parameter that needs to be configured here, refer to the table below.
| VM Size | Disk Count |
|---|---|
| Standard_L16s_v3 | 2 |
| Standard_L32s_v3 | 4 |
| Standard_L48s_v3 | 6 |
| Standard_L64s_v3 | 8 |
| Standard_L80s_v3 | 10 |
| Standard_L16as_v3 | 2 |
| Standard_L32as_v3 | 4 |
| Standard_L48as_v3 | 6 |
| Standard_L64as_v3 | 8 |
| Standard_L80as_v3 | 10 |
- Open the server configuration file.
xxxxxxxxxxvi ~/lb_install/ansible/inventories/cluster_example/host_vars/$SERVERNAME.yml- Use the example below to create or edit the configuration file.
- Edit the following variables:
$VM_IP$SERVERNAME$DISK_COUNT
xxxxxxxxxx---name: $SERVERNAMEnodes:- instanceID: 0 data_ip: $VM_IP failure_domains: - $SERVERNAME ec_enabled: false lightfieldMode: SW_LF storageDeviceLayout: initialDeviceCount: $DISK_COUNT maxDeviceCount: $DISK_COUNT allowCrossNumaDevices: true deviceMatchers:# - model =~ ".*" - partition == false - size >= gib(300)# - name =~ "nvme0n1"- Repeat this step until all VMs in the storage cluster have a configuration file.
Configuring the Group Variables File
Some parameters are applied to all servers in the cluster. These are controlled by the file at ~/lb_install/ansible/inventories/cluster_example/group_vars/all.yml. This file needs to be edited for Azure deployments.
- Open the configuration file.
xxxxxxxxxx~/lb_install/ansible/inventories/cluster_example/group_vars/all.yml- Configure the file to match the code snippet below.
xxxxxxxxxx---use_lightos_kernel: falseenable_iptables: falsepersistent_memory: falsestart_discovery_service_retries: 5#nvme_subsystem_nqn_suffix: "some_suffix"enable_iptables: falsepersistent_memory: truestart_discovery_service_retries: 5#nvme_subsystem_nqn_suffix: "some_suffix"chrony_enabled: true- Save and exit the file.
Configuring Ansible Tasks
For the installation in Azure, some task and templates files need to be changed. Run the following to configure those files.
sudo sed -i "s/datapath_config_folder: 'virtual-datapath-templates'/datapath_config_folder: 'physical-datapath-templates'/" ~/lb_install/roles/install-lightos/tasks/generate_configuration_files.yml sudo sed -i 's/^minReplicasCount: {{ 1 if use_pmem else 2 }}*$/minReplicasCount: 1/' ~/lb_install/roles/install-lightos/templates/management-templates/cluster-manager.yaml.j2 sudo sed -i 's/^minReplicasCount: {{ 1 if use_pmem else 2 }}*$/minReplicasCount: 1/' ~/lb_install/roles/install-lightos/templates/management-templates/api-service.yaml.j2