Search
Dynamic rebalancing based on physical capacity usage is an important feature designed to ensure that all of the data that was placed on all Lightbits storage instances are balanced.
This feature can be enabled or disabled per user requirements. When proactive rebalance mode is enabled, the cluster will rebalance cluster capacity - automatically preventing scenarios where one storage node in a cluster can reach read-only status, while other nodes have free space to serve more capacity.
Test Purpose
The purpose of this test is to prove that this feature can work as expected. There are several conditions to trigger this rebalancing. For additional information, please refer to Dynamic Rebalancing in the Lightbits Administration Guide.
Test Steps
- Check the proactive-rebalance setting. If it is not enabled, you can enable it with the “lbcli enable feature-flag proactive-rebalance” command.
xxxxxxxxxxroot@lightos-server00:~ lbcli get feature-flag proactive-rebalanceFeature Flag EnabledProactiveRebalance true- Create several large volumes that can consume one specific storage node at 50% physical capacity. Note that you may need to create more volumes than in the example below, to be able to select enough volumes whose replications are located in two storage servers. You can then remove these irrelevant volumes.
for i in {1..9}; do lbcli create volume --project-name=default --name=rebalance-test-vol${i} --replica-count=2 --size=5TiB --acl="acl3"; done- In the client server, check the volume and multi-path information, to make sure it consumes two specific storage nodes’ capacity, and keeps another storage node with more than 80% free capacity.
xxxxxxxxxx# list nvme devicesroot@client-a:~ nvme listNode SN ModelNamespace Usage Format FW Rev---------------- -------------------- ------------------------------------------------- -------------------------- ---------------- --------/dev/nvme0n1 b4649e6a3496d720 Lightbits LightOS 55.00 TB / 5.00 TB 4 KiB + 0 B 2.3/dev/nvme0n14 b4649e6a3496d720 Lightbits LightOS 215.00 TB / 5.00 TB 4 KiB + 0 B 2.3/dev/nvme0n17 b4649e6a3496d720 Lightbits LightOS 245.00 TB / 5.00 TB 4 KiB + 0 B 2.3/dev/nvme0n2 b4649e6a3496d720 Lightbits LightOS 65.00 TB / 5.00 TB 4 KiB + 0 B 2.3/dev/nvme0n3 b4649e6a3496d720 Lightbits LightOS 75.00 TB / 5.00 TB 4 KiB + 0 B 2.3# Check subsystems of all devicesroot@client-a:~ nvme list-subsysnvme-subsys0-NQN=nqn.2016-01.com.lightbitslabs:uuid:e7ba5876-431b-43ca-a7e5-4a0aaae3d1e1\+- nvme0 tcp traddr=10.20.130.10 trsvcid=4420 live optimized+- nvme1 tcp traddr=10.20.130.11 trsvcid=4420 live+- nvme2 tcp traddr=10.20.130.12 trsvcid=4420 live inaccessiblenvme-subsys0-NQN=nqn.2016-01.com.lightbitslabs:uuid:e7ba5876-431b-43ca-a7e5-4a0aaae3d1e1\+- nvme0 tcp traddr=10.20.130.10 trsvcid=4420 live inaccessible+- nvme1 tcp traddr=10.20.130.11 trsvcid=4420 live+- nvme2 tcp traddr=10.20.130.12 trsvcid=4420 live optimizednvme-subsys0-NQN=nqn.2016-01.com.lightbitslabs:uuid:e7ba5876-431b-43ca-a7e5-4a0aaae3d1e1\+- nvme0 tcp traddr=10.20.130.10 trsvcid=4420 live optimized+- nvme1 tcp traddr=10.20.130.11 trsvcid=4420 live+- nvme2 tcp traddr=10.20.130.12 trsvcid=4420 live inaccessiblenvme-subsys0-NQN=nqn.2016-01.com.lightbitslabs:uuid:e7ba5876-431b-43ca-a7e5-4a0aaae3d1e1\+- nvme0 tcp traddr=10.20.130.10 trsvcid=4420 live inaccessible+- nvme1 tcp traddr=10.20.130.11 trsvcid=4420 live+- nvme2 tcp traddr=10.20.130.12 trsvcid=4420 live optimizednvme-subsys0-NQN=nqn.2016-01.com.lightbitslabs:uuid:e7ba5876-431b-43ca-a7e5-4a0aaae3d1e1\+- nvme0 tcp traddr=10.20.130.10 trsvcid=4420 live optimized+- nvme1 tcp traddr=10.20.130.11 trsvcid=4420 live+- nvme2 tcp traddr=10.20.130.12 trsvcid=4420 live inaccessible- Run FIO to write data to all of these volumes, and try to make them full with sequential IO. This will make total capacity utilization in these two nodes more than 50%, and will then be expected to trigger dynamic rebalancing. This could take time, and it can be done with a script as shown below.
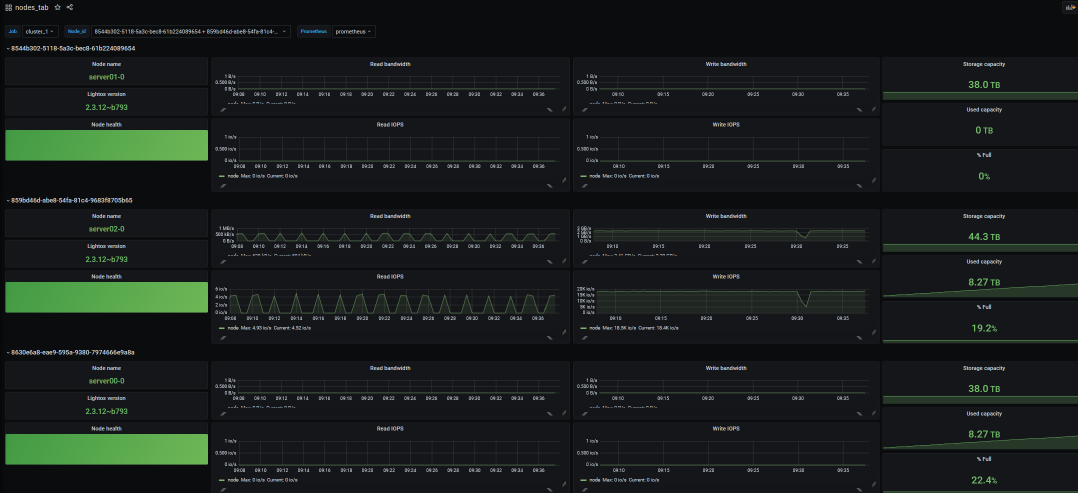
# List nvme devicesroot@client-a:~ nvme listNode SN Model Namespace Usage Format FW Rev---------------- -------------------- ------------------------------------------------- -------------------------- ---------------- --------/dev/nvme0n1 b4649e6a3496d720 Lightbits LightOS 55.00 TB / 5.00 TB 4 KiB + 0 B 2.3/dev/nvme0n14 b4649e6a3496d720 Lightbits LightOS 215.00 TB / 5.00 TB 4 KiB + 0 B 2.3/dev/nvme0n17 b4649e6a3496d720 Lightbits LightOS 245.00 TB / 5.00 TB 4 KiB + 0 B 2.3/dev/nvme0n2 b4649e6a3496d720 Lightbits LightOS 65.00 TB / 5.00 TB 4 KiB + 0 B 2.3/dev/nvme0n3 b4649e6a3496d720 Lightbits LightOS 75.00 TB / 5.00 TB 4 KiB + 0 B 2.3# Show/create fio scriptroot@client-a:~ cat fill_volumesfio -ioengine=libaio -bs 256k -filename=/dev/nvme0n1 -direct=1 --thread -rw=write -size=5TB -name='bs 256KB' -numjobs=8 --iodepth=8fio -ioengine=libaio -bs 256k -filename=/dev/nvme0n2 -direct=1 --thread -rw=write -size=5TB -name='bs 256KB' -numjobs=8 --iodepth=8fio -ioengine=libaio -bs 256k -filename=/dev/nvme0n3 -direct=1 --thread -rw=write -size=5TB -name='bs 256KB' -numjobs=8 --iodepth=8fio -ioengine=libaio -bs 256k -filename=/dev/nvme0n14 -direct=1 --thread -rw=write -size=5TB -name='bs 256KB' -numjobs=8 --iodepth=8fio -ioengine=libaio -bs 256k -filename=/dev/nvme0n17 -direct=1 --thread -rw=write -size=5TB -name='bs 256KB' -numjobs=8 --iodepth=8# Optionally use screen to run script as a sessionroot@client-a:~ screen -S fillvolume# Run scriptroot@client-a:~ ./fill_volumesbs 256KB: (g=0): rw=write , bs=(R) 256KiB -256KiB , (W) 256KiB -256KiB , (T) 256KiB -256KiB , ioengine=libaio , iodepth =8...fio -3.7Starting 8 threadsJobs: 8 (f=8): [W(8) ][0.0%][r=0KiB/s,w=1958 MiB/s][r=0,w=7832 IOPS][eta 06h:52m:02s]- During this data filling, monitor the nodes’ physical capacity utilization with the “lbcli get node” command. You can also use the Grafana monitoring GUI node dashboard to check the capacity utilization.
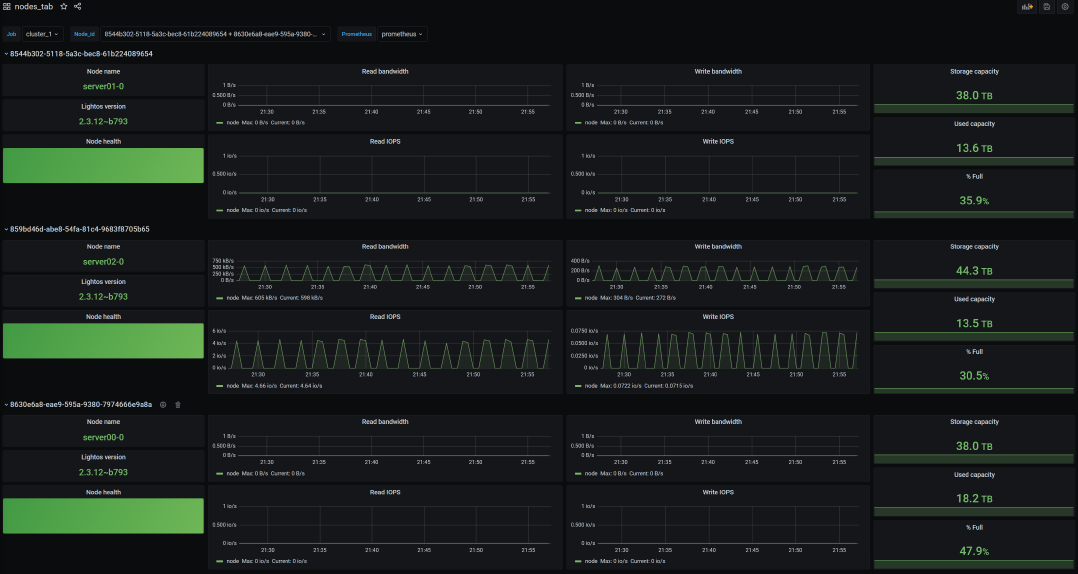
xxxxxxxxxxroot@lightos-server00:~ lbcli list nodes -o json |grep '"name "\|"physicalUsedStorage "\|"freePhysicalStorage"'"name": "server01-0","physicalUsedStorage": "0","freePhysicalStorage": "41768159890636","name": "server02-0","physicalUsedStorage": "9380893924320","freePhysicalStorage": "39348625948089","name": "server00-0","physicalUsedStorage": "9380541602784","freePhysicalStorage": "32387618287852",- After all the volumes are filled, use “nvme list-subsys” to check the nvme multi-path information. Some volumes’ replication should be moved to the new node.
xxxxxxxxxxroot@client-a:~ nvme list-subsysnvme-subsys0-NQN=nqn.2016-01.com.lightbitslabs:uuid:e7ba5876-431b-43ca-a7e5-4a0aaae3d1e1\+- nvme0 tcp traddr=10.20.130.10 trsvcid=4420 live optimized+- nvme1 tcp traddr=10.20.130.11 trsvcid=4420 live+- nvme2 tcp traddr=10.20.130.12 trsvcid=4420 live inaccessiblenvme-subsys0-NQN=nqn.2016-01.com.lightbitslabs:uuid:e7ba5876-431b-43ca-a7e5-4a0aaae3d1e1\+- nvme0 tcp traddr=10.20.130.10 trsvcid=4420 live inaccessible+- nvme1 tcp traddr=10.20.130.11 trsvcid=4420 live optimized+- nvme2 tcp traddr=10.20.130.12 trsvcid=4420 livenvme-subsys0-NQN=nqn.2016-01.com.lightbitslabs:uuid:e7ba5876-431b-43ca-a7e5-4a0aaae3d1e1\+- nvme0 tcp traddr=10.20.130.10 trsvcid=4420 live optimized+- nvme1 tcp traddr=10.20.130.11 trsvcid=4420 live inaccessible+- nvme2 tcp traddr=10.20.130.12 trsvcid=4420 livenvme-subsys0-NQN=nqn.2016-01.com.lightbitslabs:uuid:e7ba5876-431b-43ca-a7e5-4a0aaae3d1e1\+- nvme0 tcp traddr=10.20.130.10 trsvcid=4420 live+- nvme1 tcp traddr=10.20.130.11 trsvcid=4420 live optimized+- nvme2 tcp traddr=10.20.130.12 trsvcid=4420 live inaccessiblenvme-subsys0-NQN=nqn.2016-01.com.lightbitslabs:uuid:e7ba5876-431b-43ca-a7e5-4a0aaae3d1e1\+- nvme0 tcp traddr=10.20.130.10 trsvcid=4420 live optimized+- nvme1 tcp traddr=10.20.130.11 trsvcid=4420 live+- nvme2 tcp traddr=10.20.130.12 trsvcid=4420 live inaccessible- Check the capacity utilization of each node again:
Was this page helpful?