
SSD Failure Handling

AI Tools

Lightbits storage handles SSD failure with Elastic Raid capability, protecting the data stored in the Lightbits storage instance with an N+1 Erasure Coding mechanism (with N+1 representing the total number of drives in the instance).

If one SSD is failed, or removed, this feature ensures that the storage service can continue.

In parallel, the Lightbits storage instance will start the “local rebuilding” to make the data become new “N’+1” protected again. In this case, N’ is actually now N-1 because one drive was removed. So essentially after a drive is removed or fails, it reprotects to ((N-1) + 1).

This feature can be enabled or disabled during the installation. Note also that after adding a drive in properly, it will reprotect back to N+1. The rebuild we are seeing is that protection.

If another drive fails after the rebuild, it will rebuild again to (N-2) + 1. Capacity lowers with each drive failure/removal reprotection, so we want to make sure we are not at usage capacity. Additionally, EC works with eight or more drives.

Important Notes:
  • Only a single SSD failure is tolerated per storage instance without disruption.

  • If a second SSD in the same storage instance fails while the first is still rebuilding, the storage instance becomes inactive, even though data may remain protected at the cluster level.

Test Purpose

The purpose of this test is to prove that this feature can work as expected with manual commands. It will use a Linux command to remove one specific SSD from the PCIe bus to simulate the SSD failure or removal, and check whether the IO can continue. It also checks the “local rebuild” progress.

Test Steps

  1. Create a volume for one specific client, and then from the client side check the multi-path information of this specific volume to know the location of the primary replication. And then use FIO to generate a continuous IO load to this volume. This is shown in the example below.

# Ensure volume is mounted root@client-b:~ nvme list Node SN Model Namespace Usage Format FW Rev ---------------- -------------------- ---------------------------------------- --------- -------------------------- ---------------- -------- /dev/nvme0n1 b4649e6a3496d720 Lightbits LightOS 6 64.00 GB / 64.00 GB 4 KiB + 0 B 2.3 # Check primary contoller root@client-b:~ nvme list-subsys /dev/nvme0n1 nvme-subsys0-NQN=nqn.2016-01.com.lightbitslabs:uuid:e7ba5876-431b-43ca-a7e5-4a0aaae3d1e1 \+ - nvme0 tcp traddr=10.20.130.10 trsvcid=4420 live optimized +- nvme1 tcp traddr=10.20.130.11 trsvcid=4420 live inaccessible +- nvme2 tcp traddr=10.20.130.12 trsvcid=4420 live # Check/create FIO file root@client-b:~ cat rand_rw_70-30.fio #FIO profile - Random 70/30: [global] runtime=6000 ramp_time=0 rw=randrw # READ/WRITE rwmixread=70 # Here it 's used refill_buffers loops=1 buffer_compress_percentage=50 buffer_compress_chunk=4096 direct=1 norandommap=1 time_based cpus_allowed_policy=split log_avg_msec=1000 numjobs=8 # Number of CPU cores cpus_allowed=0-7 # Names of CPUs (0-<line above -1>) iodepth=12 randrepeat=0 ioengine=libaio group_reporting=1 bs=4k [job1] filename=/dev/nvme0n1 # Run FIO job [root@client -b fio_demo] fio rand_rw_70-30.fio job1: (g=0): rw=randrw , bs=(R) 4096B -4096B, (W) 4096B -4096B, (T) 4096B -4096B, ioengine=libaio , iodepth =12 ... fio -3.7 Starting 8 processes Jobs: 8 (f=8): [m(8) ][0.2%][r=559 MiB/s,w=240 MiB/s][r=143k,w=61.3k IOPS][eta 01h:39m :49s]
  1. On the primary replication resided storage server side, use the following Linux command to remove one specific SSD device from the PCIe bus, to simulate the SSD removal. Use the “nvme list” command to verify whether the SSD was removed.

# List nvme devices for the primary Lightbits controller root@lightos-server00:~ nvme list Node SN Model Namespace Usage Format FW Rev ---------------- -------------------- ---------------------------------------- --------- -------------------------- ---------------- -------- /dev/nvme0n1 PHLJ9505028K8P0HGN INTEL SSDPE2KX080T8 1 8.00 TB / 8.00 TB 512 B + 0 B VDV10131 /dev/nvme1n1 PHLJ951300578P0HGN INTEL SSDPE2KX080T8 1 8.00 TB / 8.00 TB 512 B + 0 B VDV10131 /dev/nvme2n1 PHLJ950300CC8P0HGN INTEL SSDPE2KX080T8 1 8.00 TB / 8.00 TB 512 B + 0 B VDV10131 /dev/nvme3n1 PHLJ9515005C8P0HGN INTEL SSDPE2KX080T8 1 8.00 TB / 8.00 TB 512 B + 0 B VDV10131 /dev/nvme4n1 PHLJ950300SE8P0HGN INTEL SSDPE2KX080T8 1 8.00 TB / 8.00 TB 512 B + 0 B VDV10131 /dev/nvme5n1 PHLJ9515010P8P0HGN INTEL SSDPE2KX080T8 1 8.00 TB / 8.00 TB 512 B + 0 B VDV10131 /dev/nvme6n1 PHLJ950500RD8P0HGN INTEL SSDPE2KX080T8 1 8.00 TB / 8.00 TB 512 B + 0 B VDV10131 /dev/nvme7n1 PHLJ950501SE8P0HGN INTEL SSDPE2KX080T8 1 8.00 TB / 8.00 TB 512 B + 0 B VDV10131 # Remove one of the devices in use root@lightos-server00:~ echo 1 > /sys/class/nvme/nvme3/device/remove # Check device is removed root@lightos-server00:~ nvme list Node SN Model Namespace Usage Format FW Rev ---------------- -------------------- ---------------------------------------- --------- -------------------------- ---------------- -------- /dev/nvme0n1 PHLJ9505028K8P0HGN INTEL SSDPE2KX080T8 1 8.00 TB / 8.00 TB 512 B + 0 B VDV10131 /dev/nvme1n1 PHLJ951300578P0HGN INTEL SSDPE2KX080T8 1 8.00 TB / 8.00 TB 512 B + 0 B VDV10131 /dev/nvme2n1 PHLJ950300CC8P0HGN INTEL SSDPE2KX080T8 1 8.00 TB / 8.00 TB 512 B + 0 B VDV10131 /dev/nvme4n1 PHLJ950300SE8P0HGN INTEL SSDPE2KX080T8 1 8.00 TB / 8.00 TB 512 B + 0 B VDV10131 /dev/nvme5n1 PHLJ9515010P8P0HGN INTEL SSDPE2KX080T8 1 8.00 TB / 8.00 TB 512 B + 0 B VDV10131 /dev/nvme6n1 PHLJ950500RD8P0HGN INTEL SSDPE2KX080T8 1 8.00 TB / 8.00 TB 512 B + 0 B VDV10131 /dev/nvme7n1 PHLJ950501SE8P0HGN INTEL SSDPE2KX080T8 1 8.00 TB / 8.00 TB 512 B + 0 B VDV10131
  1. Check the status of FIO. The IO should continue even after this SSD is removed.

job1: (g=0): rw=randrw , bs=(R) 4096B -4096B, (W) 4096B -4096B, (T) 4096B -4096B, ioengine=libaio , iodepth =12 ... fio -3.7 Starting 8 processes Jobs: 8 (f=8): [m(8) ][13.8%][r=527 MiB/s,w=226 MiB/s][r=135k,w=57.7k IOPS][eta 01h:26 m:14s]
  1. Check the Lightbits storage instance status and verify the local rebuild progress. Typically this rebuild takes one to a few hours, depending on how many SSDs are installed and how much data is written.

root@lightos-server00:~ lbcli list nodes Name UUID State NVMe endpoint Failure domains Local rebuild progress server01-0 8544b302-5118-5a3c-bec8-61b224089654 Active 172.16.231.71:4420 [server01] None server02-0 859bd46d-abe8-54fa-81c4-9683f8705b65 Active 172.16.231.72:4420 [server02] None server00-0 8630e6a8-eae9-595a-9380-7974666e9a8a Active 172.16.231.70:4420 [server00] 2
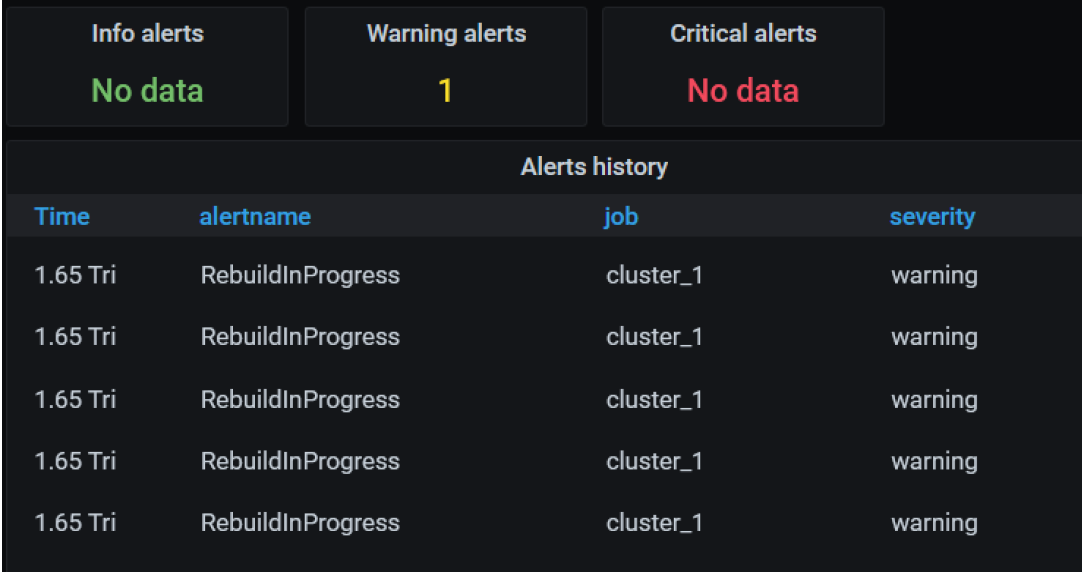
  1. Check the Grafana monitoring GUI, to verify that the warning happened as expected (Cluster_tab). You can also monitor the local rebuild progress with the Grafana GUI.

To re-add the device (to linux), run:

root@lightos-server00:~ echo 1 | sudo tee /sys/bus/pci/rescan


On This Page